在 CUBA 应用程序中使用图片
在 CUBA 应用程序中有几种使用图片的方式。在本指南中会演示如何上传和显示图片。也演示了如何将图片附加到实体同时允许用户从应用程序中下载图片文件。
将要构建的内容
本指南对 CUBA 宠物诊所示例进行了增强,允许用户附加图片到实体,并且使用这些图片。特定是进行了下列修改:
-
允许给兽医上传头像
-
在兽医浏览界面显示兽医的头像
-
创建了类似 lookup 的自定义组件,使用这个组件显示将兽医头像显示在姓名旁边
-
允许给就诊记录附加 X-光照片,也可以查看这些照片

开发环境要求
您的开发环境需要满足以下条件:
-
文件编辑器或者IDE (推荐使用 IntelliJ IDEA )
-
独立运行版或者IDEA插件版的 CUBA Studio (可选)
-
CUBA CLI (可选)
下载 并解压本指南的源码,或者使用 git 克隆下来:
示例: CUBA 宠物诊所
这个示例是以 CUBA 宠物诊所项目为基础,而这个项目的基础是众所周知的 Spring 宠物诊所项目。CUBA 宠物诊所应用程序涉及到了宠物诊所的领域模型及与管理一家宠物诊所相关的业务流程。
这个应用程序的领域模型如下:

主要的实体是 Pet 和 Visit。 Pet 到诊所就诊,就诊时(Vist) 会有一名兽医(Vet)负责照顾它。每个宠物都有主人,一个主人可以有多个宠物。一次就诊(Vist)即是一个宠物在主人的帮助下到诊所诊治的活动。

CUBA 文件存储子系统
CUBA 提供了一组综合性的功能用来在应用程序中处理文件。 底层子系统被称作 文件存储。
这组 API 为开发人员在文件处理方面提供了端对端(前端到后端)的功能实现:
-
用户上传文件的功能
-
在业务实体中保存文件引用
-
在应用程序中读&写文件
-
用户下载文件的功能
文件存储子系统从物理文件中分离出文件元数据,文件元数据存储在关系数据库,物理文件存储在文件系统。
关于这个主题的详细信息可参考文档:https://doc.cuba-platform.cn/manual-7.0-chs/file_storage.html[文件存储] 。
由于图片是一种比较特别的文件类型,所以对于图片文件的处理加入了一些特殊的额外行为,比如在浏览器中预览图片。
兽医头像图片
本指南的第一个示例是允许用户上传并显示特定兽医的头像图片。
要实现这个功能,宠物诊所示例中的数据模型需要进行一些改进,以便在 Vet 实体中存储文件引用。 CUBA 内置的对应 JPA 实体是 FileDescriptor 。 它存储文件的元数据部分, 同时作为指向物理文件的指针。
关系类型是 MANY-TO-ONE 。在 Studio 的实体设计器中结果看起来是这样:

由于实体模型包含对 FileDescriptor 实体的引用,属性 image 必须被添加到视图中,以便在 UI 中使用这个属性。
实体的 vet-with-specialties 视图在兽医(Vet)编辑界面使用,必须修改成包含 image 属性:
<view class="com.haulmont.sample.petclinic.entity.vet.Vet"
      extends="_local"
      name="vet-with-specialties-and-image">
    <property name="specialties"
              view="_minimal"/>
    <property name="image" view="_base" />
</view>
进行了这个调整后有必要将视图重命名为 vet-with-specialties-and-image ,以反映出视图内容。
上传兽医头像
满足了上述先决条件后,下一步是调整兽医编辑界面,以允许在创建或编辑兽医记录时可以上传图片。
CUBA 有一个内置的用于处理 FileDescriptor 实例的 UI 组件。这个组件可以添加到 vet-edit.xml 界面描述文件中的 <form /> 表单组件中。
<form id="fieldGroup" dataContainer="vetDc">
    <column width="250px">

        <textField property="firstName"/>
        <textField property="lastName"/>

        <upload id="imageField"
                property="image" (1)
                fileStoragePutMode="IMMEDIATE"
                showFileName="true"
        />

    </column>
</form>| 1 | FileUploadField 组件将上传的文件绑定到 vetDc 数据容器的 image 属性 |
有几个控制上传组件行为的选项,可在这里找到: 参考文档 。在当前案例中,使用默认行为就可以了。它允许用户上传、下载、移除和重新上传文件,并且直接将文件附加到编辑界面上的 Vet 实例。
最终用户界面看下来是这样:
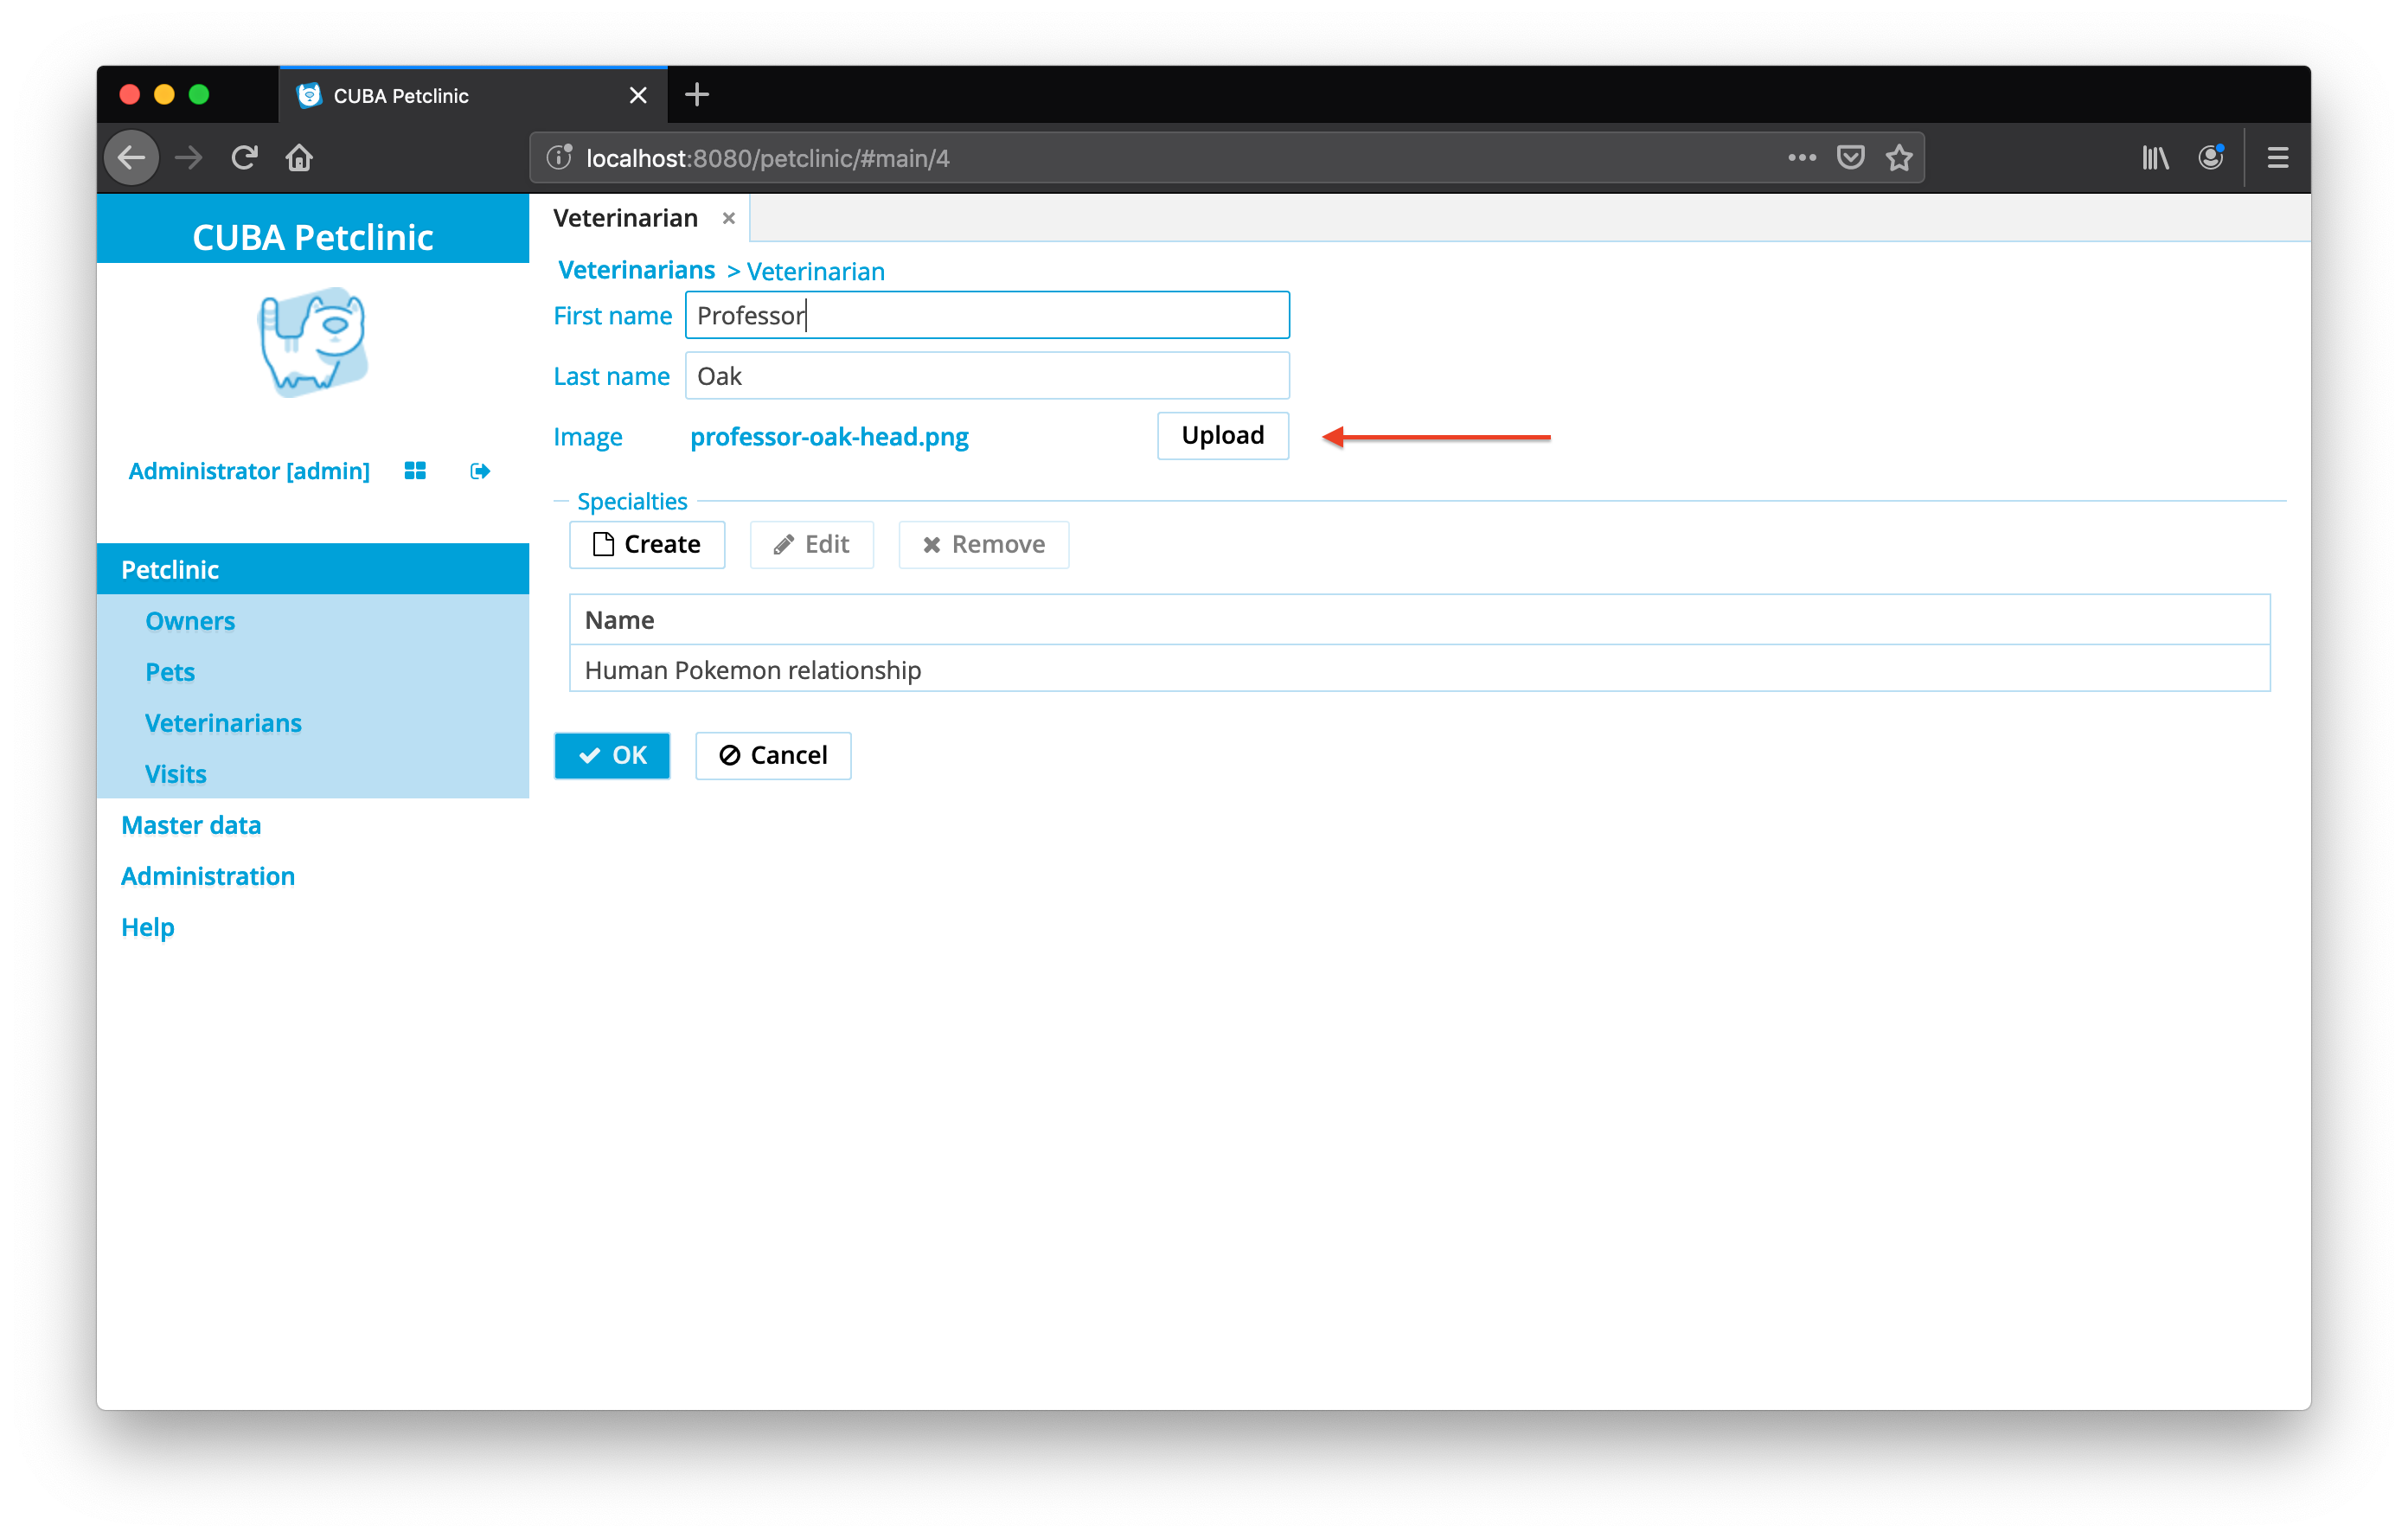
fileStoragePutMode 属性设置为 IMMEDIAT 时,文件上传完成后会被持久化并且直接创建一个 FileDescriptor 实体实例。这种方式的好处是 Vet 实例会和图片直接关联起来,不需要额外的编程处理。
但是,这种方式有一个副作用: 在 Vet 实例没有保存的情况下,文件仍然会被保存到文件系统。这个文件也可以通过 Administration > External Files 功能查到。 如果这不是想要行为, 可以将 fileStoragePutMode 设置为 MANUAL ,这时就需要手动管理文件的持久化。 接下来的用例会描述这种行为的更多细节。
在浏览表格中显示兽医的头像
下一个示例是处理上传的兽医头像图片,这个图片要显示在兽医浏览界面。要做到这点, image 属性应该出现在相应的视图(根据上面的视图修改而来)
在界面上显示图片的第二个 UI 组件是 <image /> 组件。它允许使用各种来源来渲染一个图片,来源包括:
-
来自文件系统/classpath 的图片
-
来自任务 URL 的图片
-
来自
FileDescriptor实例
参考 CUBA 文档: 图片 UI 组件 了解更多关于各种选项的信息。
在这种情况下,由于 Vet 通过 image 属性实例持有 FileDescriptor 的引用,所以可以直接渲染文件引用的图片。
最终 UI 看起来是这样:
image 属性应该是兽医表格中的一列,此外,这列应该渲染一个特定的图片,不应该是 FileDescriptor 实例的实例名,而是图片本身。
要实现这种效果,就需要在控制器中写一些代码。
Table 组件有一个特别的方法: addGeneratedColumn ,这个方法允许为特定的列定义一个组件来作为这个列的渲染器。 这个方法对于每个要显示的实体都调用一次,接受相应的实体实例作为参数。
public class VetBrowse extends StandardLookup<Vet> {

    @Inject
    protected GroupTable<Vet> vetsTable;

    @Inject
    protected UiComponents uiComponents;

    @Subscribe
    protected void onInit(InitEvent event) {
        vetsTable.addGeneratedColumn( (1)
                "image",
                this::renderAvatarImageComponent
        );
    }

    private Component renderAvatarImageComponent(Vet vet) {
        FileDescriptor imageFile = vet.getImage(); (2)
        if (imageFile == null) {
            return null;
        }
        Image image = smallAvatarImage();
        image.setSource(FileDescriptorResource.class)
                .setFileDescriptor(imageFile); (4)

        return image;
    }

    private Image smallAvatarImage() {
        Image image = uiComponents.create(Image.class);  (3)
        image.setScaleMode(Image.ScaleMode.CONTAIN);
        image.setHeight("40");
        image.setWidth("40");
        image.setStyleName("avatar-icon-small");
        return image;
    }
}| 1 | 通过 renderAvatarImageComponent 方法在 vetsTable 表格中注册一个新的列: image |
| 2 | 通过 Vet 实例的 image 属性获取到 FileDescriptor 引用 |
| 3 | UI 基础设施 uiComponents bean 是编程方式创建 UI 组件的入口点 |
| 4 | Image 组件通过 FileDescriptorResource 变体类型绑定到 FileDescriptor |
有了这些代码,就可以创建一个 Image 组件、配置好并绑定到 FileDescriptor 实例。使用 CSS 类 avatar-icon-small,图片就可以渲染成上面展示的效果。
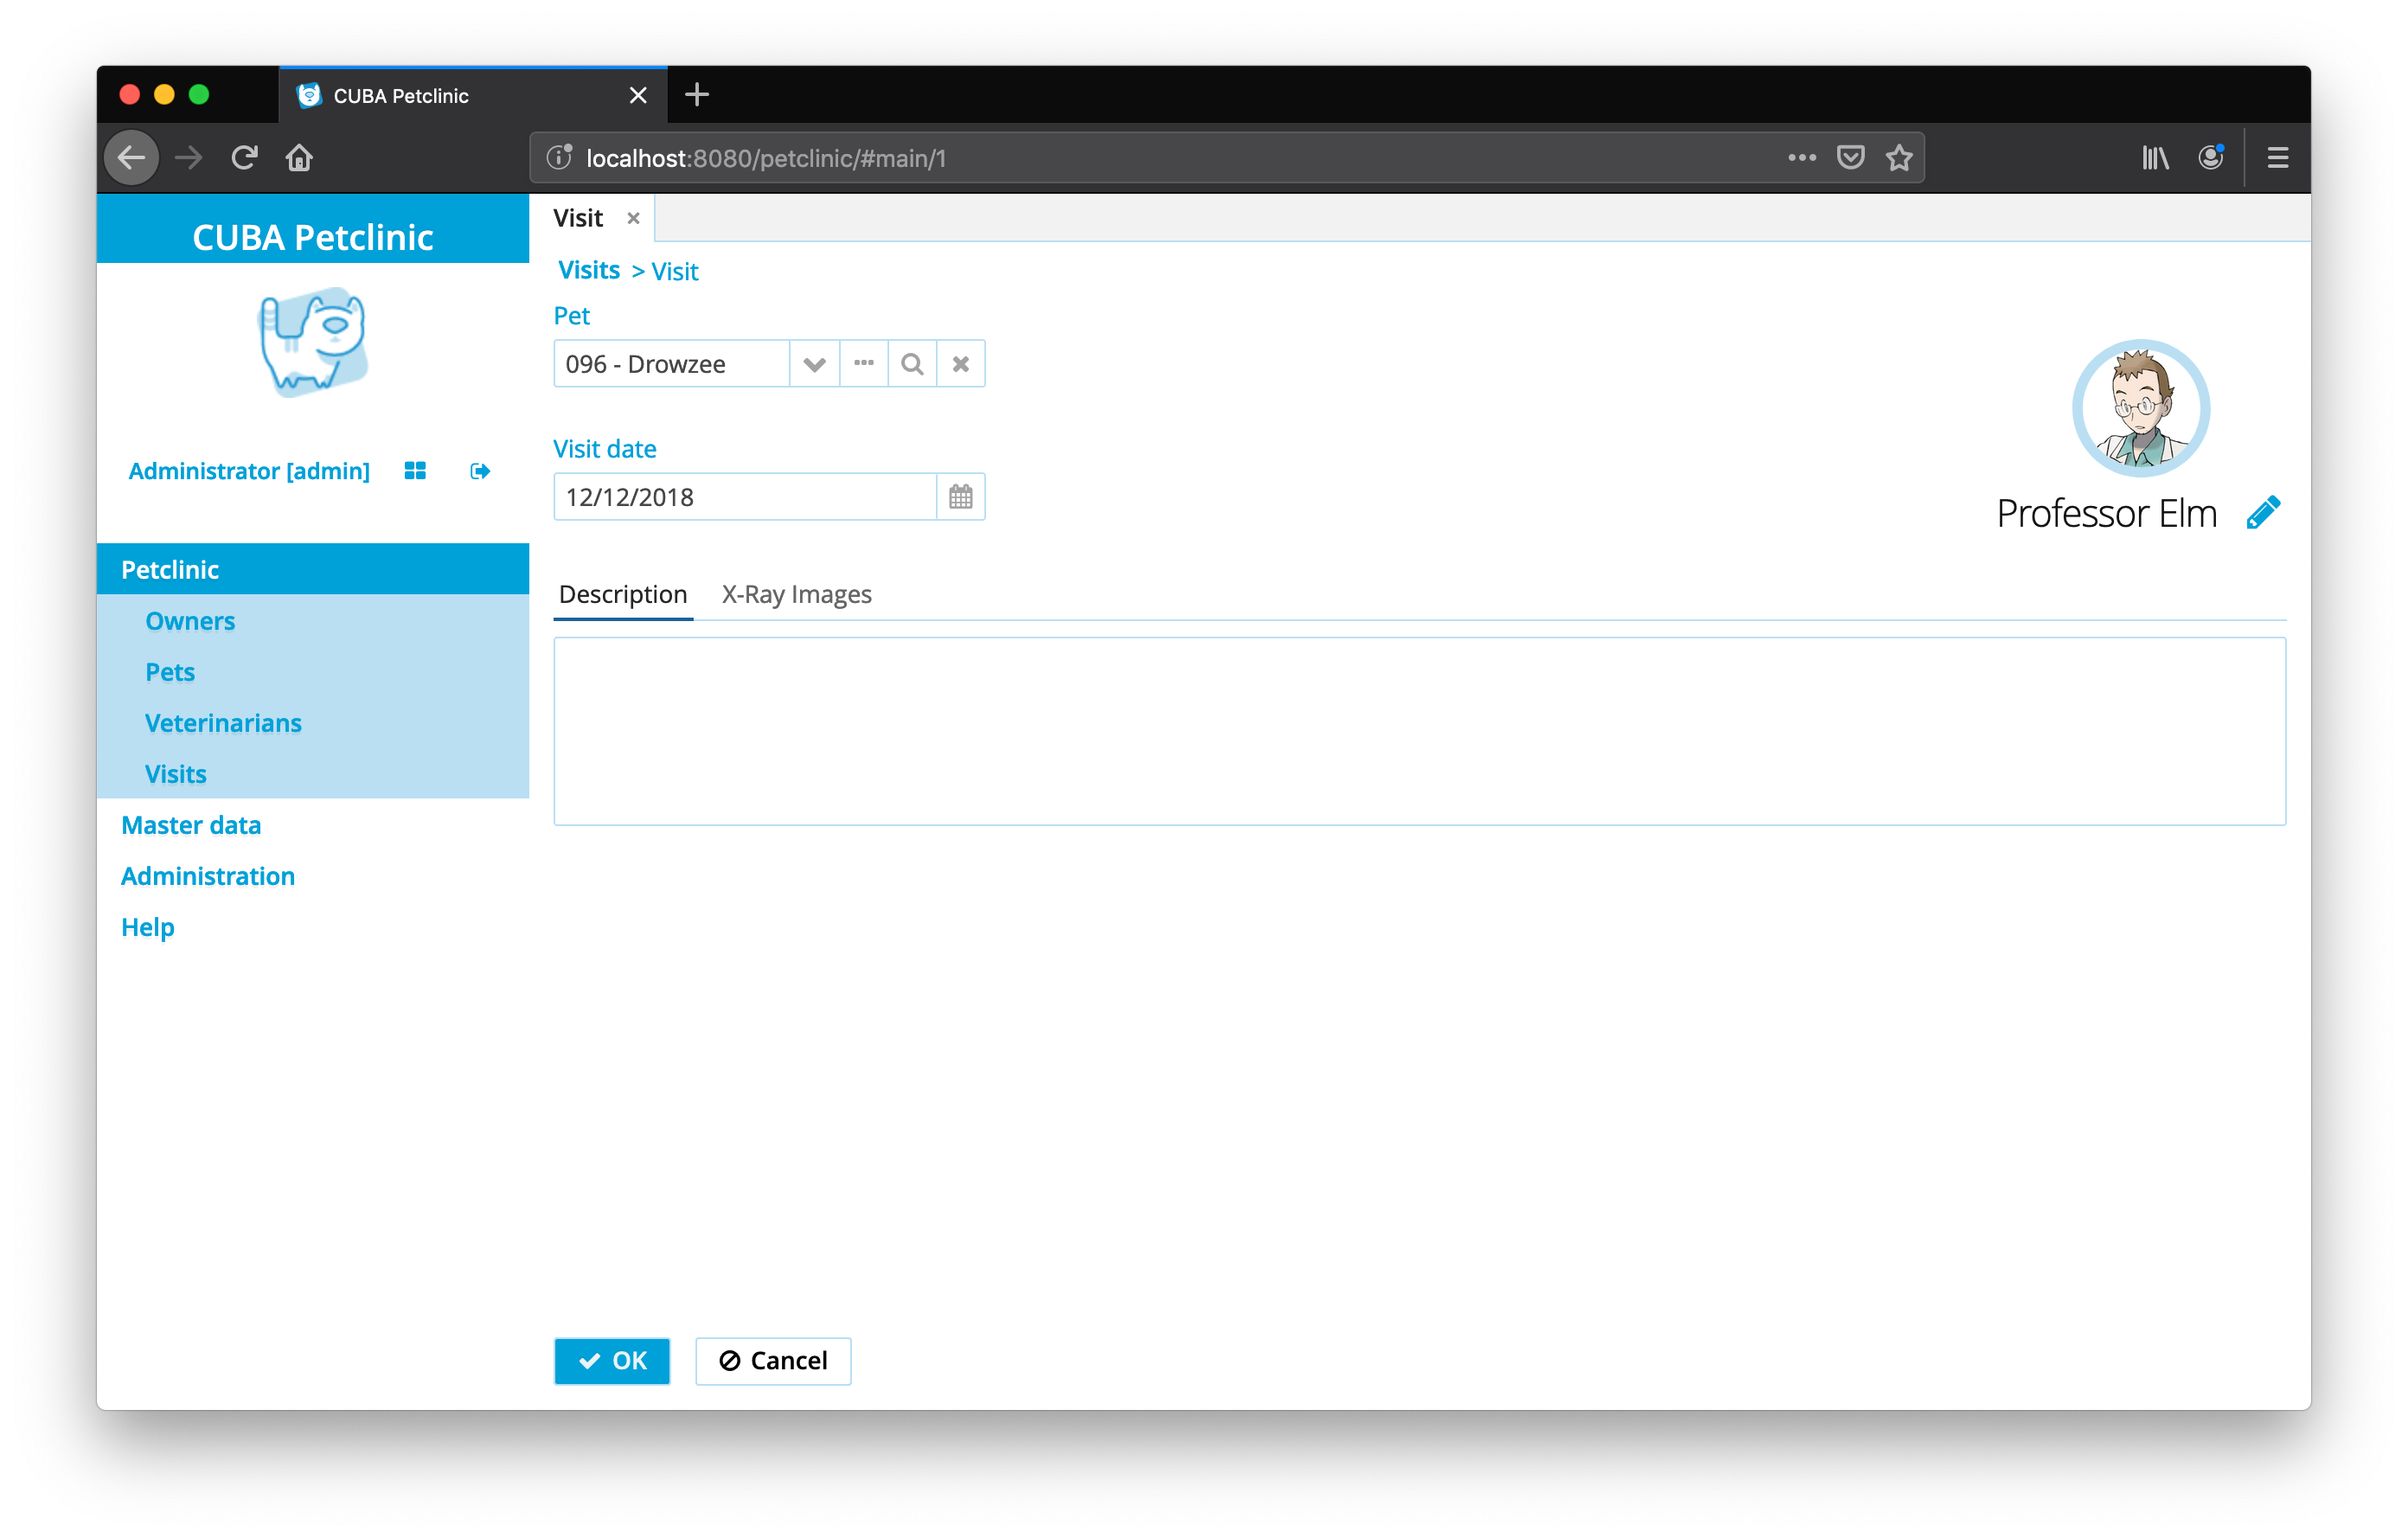
创建包含头像的兽医 Lookup 组件
兽医头像功能的最后一部分是就诊详情界面,在兽医姓名的旁边应该显示兽医的头像。
在这里需要以另外一种方式应用 image 组件,即将其作为 Visit 编辑界面的一部分放在 <form /> 组件中。
实现这个功能的源码分由两部分组成:
-
VetEdit控制器协调自定义组件的创建和绑定 -
VetPreviewComponentFactory负责使用合适的布局创建上面显示的组件,并且绑定到InstanceContainer的指定字段
|
使用专门的工厂类来定义创建组件的方式只是一个对实现进行结构化的可能选项。将组件的创建提取到专门的类有几点好处,比如可以做到封装、关注点分离及在其它界面重用。 但是也可以将组件的创建逻辑直接写在控制器中。这种方式可以在一个关于如何在UI层结构化应用程序逻辑的示例中看到。关于这个主题的详细信息可以参考本指南:https://www.cuba-platform.cn/guides/create-business-logic-in-cuba[在 CUBA 中创建应用程序逻辑]。 |
在 VetEdit 控制器中创建组件的代码看起来是这样:
public class VisitEdit extends StandardEditor<Visit> {

    @Inject
    protected Form treatingVetForm;

    @Inject
    protected InstanceContainer<Visit> visitDc;

    // ...

    @Subscribe
    protected void renderTreatingVetLayout(AfterShowEvent event) {

        VetPreviewComponentFactory vetPreviewComponentFactory =
            new VetPreviewComponentFactory( (1)
                uiComponents,
                screenBuilders,
                messageBundle,
                this
            );

        Component vetPreview = vetPreviewComponentFactory.create(  (2)
                visitDc,
                vet -> getEditedEntity().setTreatingVet(vet)
        );

        treatingVetForm.add(vetPreview); (3)
    }
}| 1 | 使用必须依赖创建 VetPreviewComponentFactory 实例 |
| 2 | create 方法创建一个显示 Vet 头像的 image 组件 |
| 3 | 创建的组件附加到 treatingVetForm 来渲染头像图片 |
The VetPreviewComponentFactory code contains a little bit more code for correct positioning of the elements within the layout. The key points are listed below (the complete class can be found in the example project: VetPreviewComponentFactory.java).
public class VetPreviewComponentFactory {

    private final UiComponents uiComponents;
    private final ScreenBuilders screenBuilders;
    private final FrameOwner frameOwner;

    public Component create( (1)
            InstanceContainer<Visit> visitDc,
            Consumer<Vet> vetSelectionHandler
    ){
        return verticalLayout(
                vetImage(visitDc),
                horizontalLayout(
                        treatingVetName(visitDc),
                        editVetButton(vetSelectionHandler)
                )
        );
    }

    // ...

    private Image vetImage(InstanceContainer<Visit> visitDc) {

        Image image = uiComponents.create(Image.class);
        // ...
        image.setValueSource(
                new ContainerValueSource<>(visitDc, "treatingVet.image") (2)
        );
        return image;
    }

    private Button editVetButton(Consumer<Vet> vetSelectionHandler) {

        LinkButton button = uiComponents.create(LinkButton.class);
        // ...
        button.setAction(
                new BaseAction("changeVet")
                .withHandler(event -> openVetLookup(event, vetSelectionHandler)) (3)
        );
        return button;
    }

    private void openVetLookup(
            Action.ActionPerformedEvent event,
            Consumer<Vet> vetSelectionHandler
    ) {
        screenBuilders.lookup(Vet.class, frameOwner)
                .withOpenMode(OpenMode.DIALOG)
                .withSelectHandler(
                        vets -> vetSelectionHandler.accept(vets.iterator().next())
                )
                .show();
    }
}| 1 | 使用一个 vertical 布局包含 image,一个 horizontal 布局包含名称和创建的 "Edit" 按钮 |
| 2 | ValueSource 引用了数据容器中关联的 treatingVet 实体的 image 属性 |
| 3 | "Edit" 按钮的处理器(handler) 触发提供的 vetSelectionHandler ,所以相关的操作可以在工厂方法外部控制 |
完成这些后,自定义的兽医(Vet)展示选择界面看起来是这样:
诊疗过程的 X光照片
本指南中涉及到的第二个用例给特定的诊疗记录附加 X光照片。选中表格行时应该显示X光照片。更进一步,也应该可以上传和下载这些照片。
我们需要对数据模型进行一点调整。像前面的 Vet 实体, Visit 实体也需要引用 FileDescriptor , 但是这次是需要使用 MANY-TO-MANY 关系。对领域模型调整后,相应的视图也需要调整来处理X光照片的上传、预览和下载。
上传 X光照片
第一步是上传X光照片到特定的 Visit 实例。这需要将下面的 <upload /> 组件放到 xRayImagesTable 表格的 <buttonsPanel /> 组件中。相较于第一个用例, 这次 fileStoragePutMode 将被设置为 MANUAL ,这会给特定场景下的持久化行为带来更大的自由度。
<upload id="upload"
        showClearButton="false"
        uploadButtonIcon="UPLOAD"
        uploadButtonCaption=""
        fileStoragePutMode="MANUAL" (1)
        permittedExtensions=".png,.jpg,.pdf" (2)
        dropZone="contentHBox" (3)
showFileName="false"/>| 1 | 持久化操作在控制器中手动处理,以正确地显示图片预览 |
| 2 | 允许上传PDF文件或图片 |
| 3 | 额外的拖放区允许用户拖放文件到表格或预览组件上 |
相应的 VisitEdit 控制器订阅 upload 组件的 FileUploadSucceedEvent 事件。
public class VisitEdit extends StandardEditor<Visit> {

    @Inject
    protected CollectionPropertyContainer<FileDescriptor> xRayImagesDc;

    @Inject
    protected FileUploadField upload;

    @Inject
    protected DataContext dataContext;

    @Inject
    protected FileUploadingAPI fileUploadingAPI;

    @Subscribe("upload")
    protected void onUploadFileUploadSucceed(
            FileUploadField.FileUploadSucceedEvent event
    ) {
        FileDescriptor imageDescriptor = upload.getFileDescriptor(); (1)

        try {
            fileUploadingAPI.putFileIntoStorage(upload.getFileId(), imageDescriptor); (2)

            FileDescriptor savedImageDescriptor = dataManager.commit(imageDescriptor);
            newImageDescriptors.add(savedImageDescriptor);

            xRayImagesDc.getMutableItems().add(savedImageDescriptor); (3)
            /* ... */
        } catch (FileStorageException e) {
            /* ... */
        }
    }
}| 1 | 为上传的文件创建的 FileDescriptor 实例需要被持久化 |
| 2 | 上传的文件被传送到后端并持久化到文件存储(FileStorage) |
| 3 | 已经持久化的文件的 FileDescriptor 实例被分配给 X-Ray images M:N 关系,以显示在表格中 |
| 除了列出的代码以外, 在示例项目中还有一些相关的代码。 这些代码用于处理用户上传照片后又取消诊疗记录的编辑操作的情况。在这种情况下,上传的图片需要被移除。详细信息请参考示例代码: VisitEdit.java. |
通过以上代码实现了X光照片的上传功能,可以进行下一步:预览上传的图片
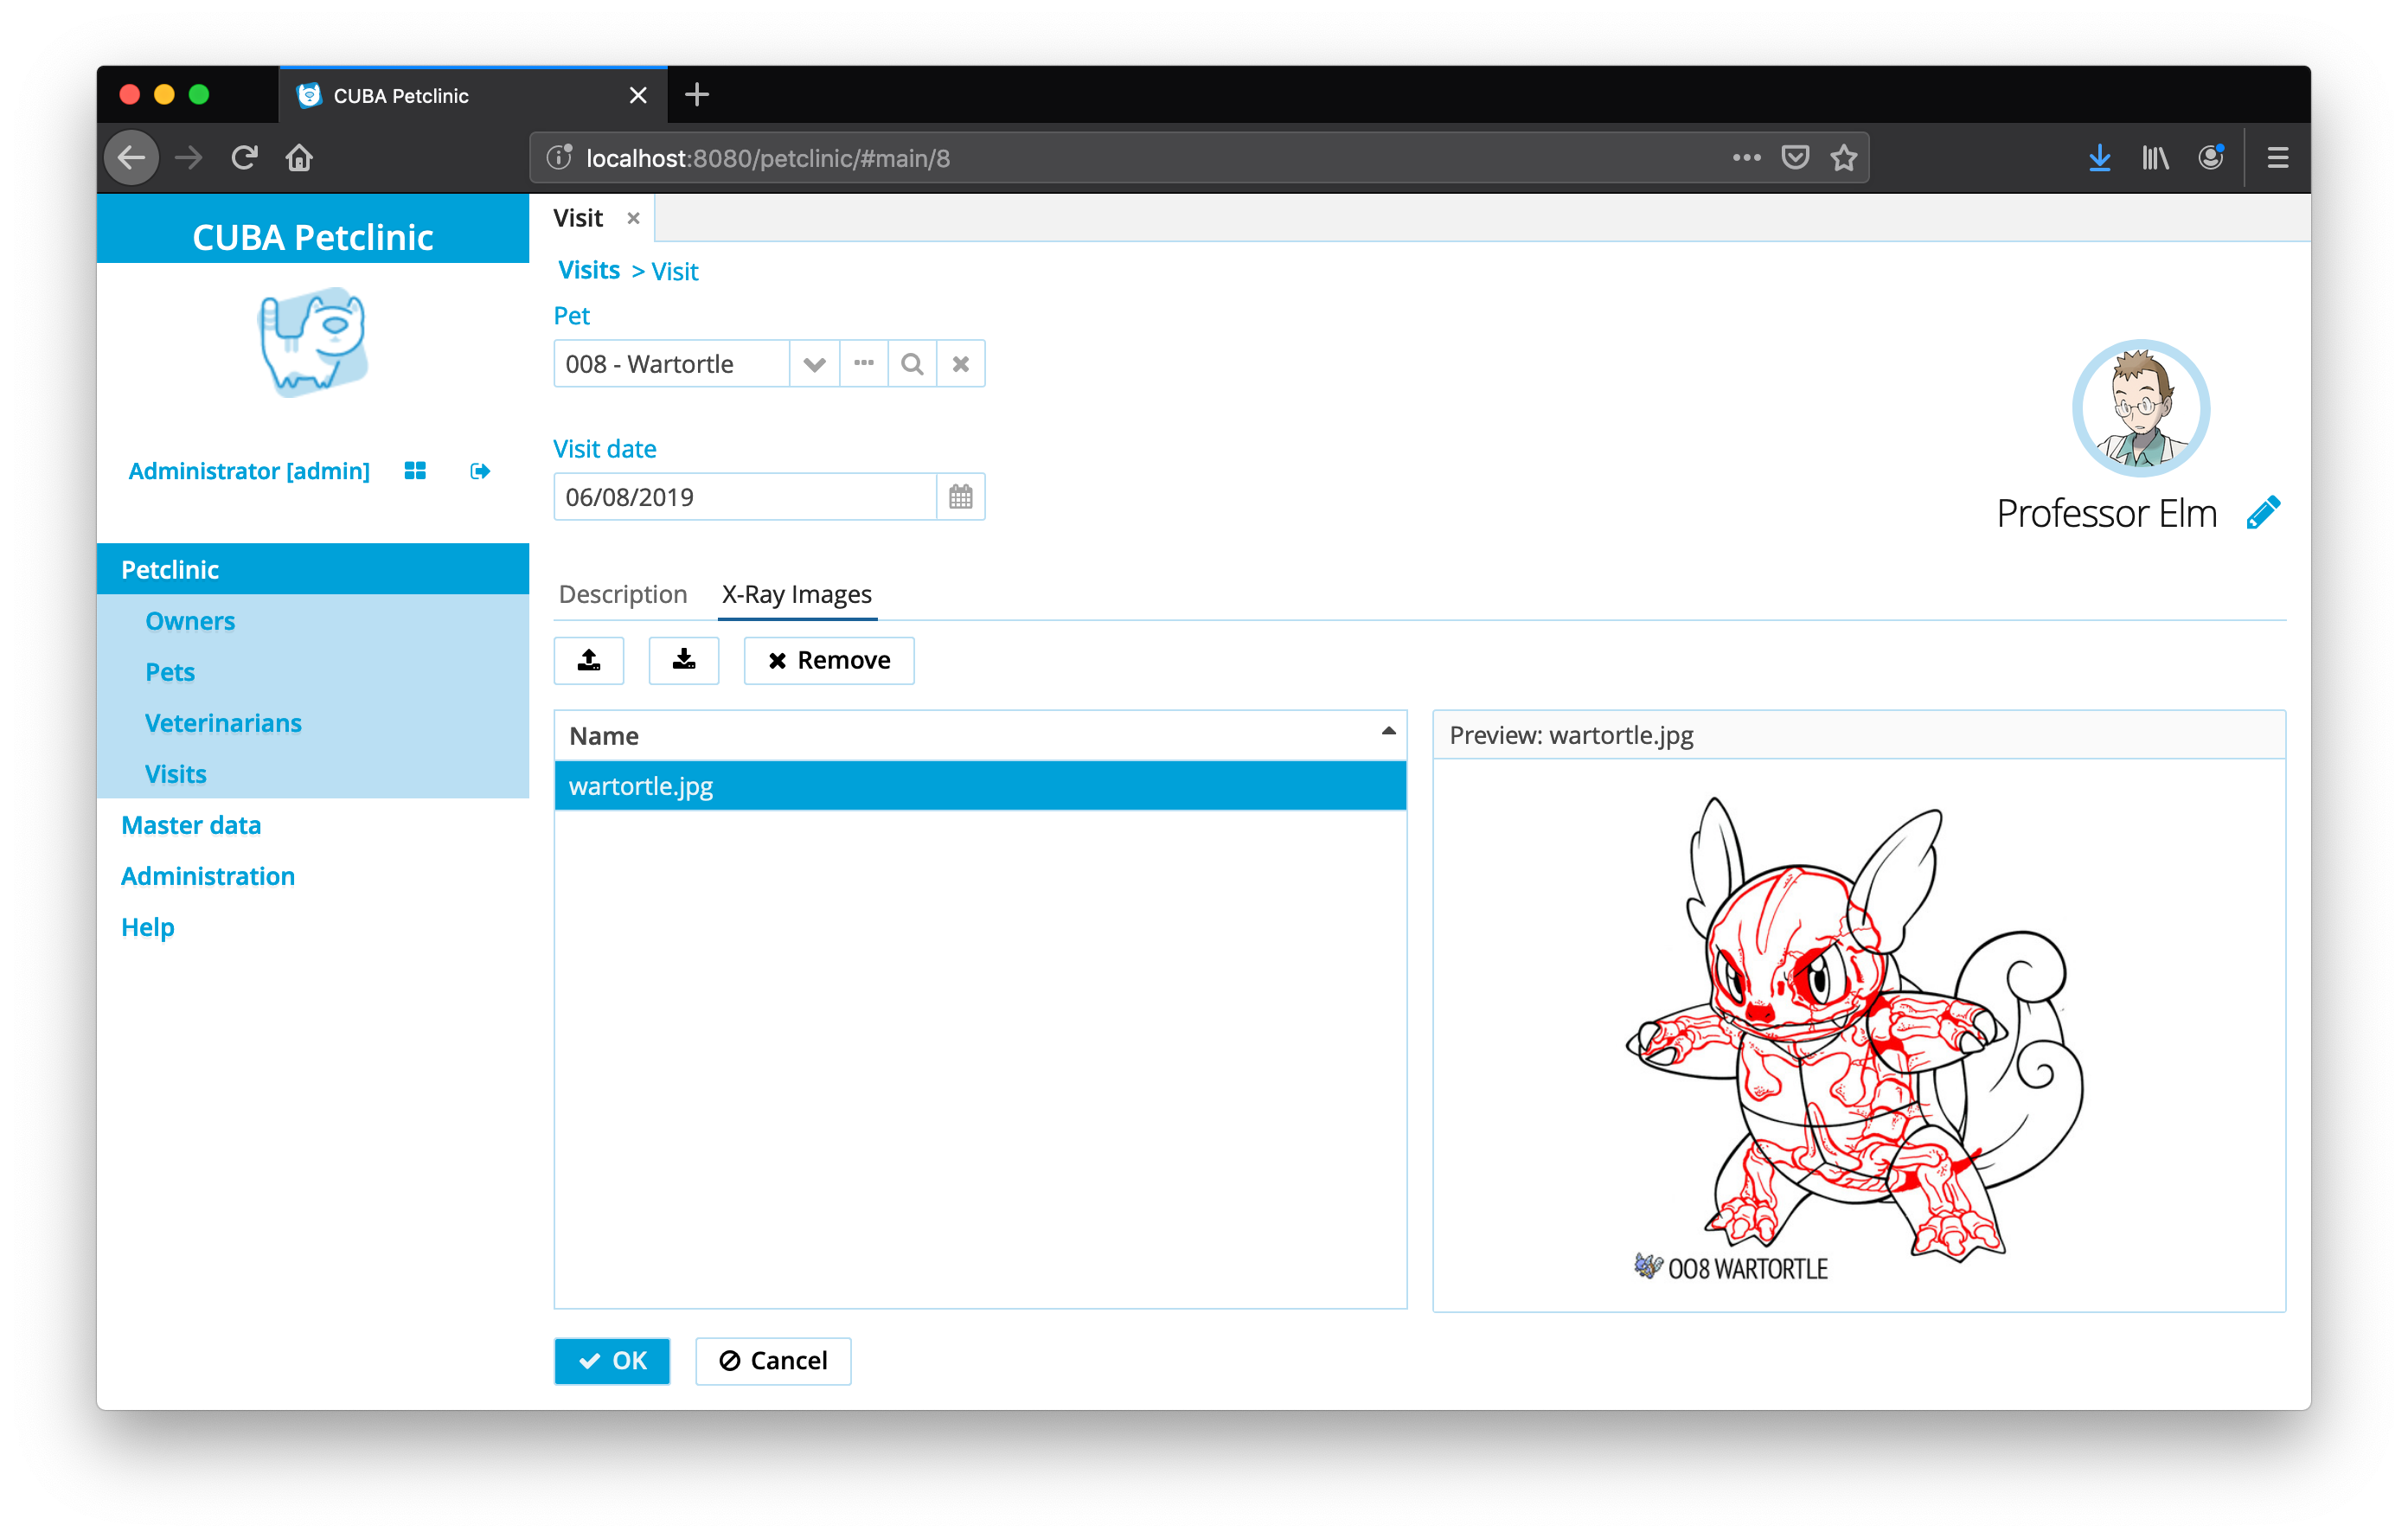
X光照片预览
要预览上传的X光图片,visit-edit.xml 需要调整一下,以让它能在 X光照片表格的旁边显示预览图。
<hbox id="contentHBox" spacing="true" width="100%">
    <table id="xRayImagesTable"
           dataContainer="xRayImagesDc"
           width="100%"
           height="100%"
           columnControlVisible="false">
        <actions>
            <action id="download" trackSelection="true" icon="DOWNLOAD"/>
            <action id="edit" type="edit"/>
            <action id="remove" type="remove"/>
        </actions>
        <columns>
            <column id="name"/>
        </columns>
    </table>
    <hbox id="xrayImageWrapperLayout"
          height="100%"
          width="100%"
          spacing="true">
    </hbox>
</hbox>
这个用例中最重要的部分是 xrayImageWrapperLayout 组件,它作为一个占位符将在后续用于显示图片。当前它不包含任何子组件,而是在 xRayImagesTable 表格的选中行变化后被动态填充。
public class VisitEdit extends StandardEditor<Visit> {

    @Inject
    protected Table<FileDescriptor> xRayImagesTable;

    @Subscribe("xRayImagesTable")
    protected void onXRayImagesTableSelection(
            Table.SelectionEvent<FileDescriptor> event
    ) {
        xrayImageWrapperLayout.removeAll();
        Set<FileDescriptor> selectedXrayImages = event.getSelected(); (1)
        if (!selectedXrayImages.isEmpty()) {
            xrayImageWrapperLayout.add( (2)
                    xrayImage(
                            selectedXrayImages.iterator().next()
                    )
            );
        }
    }

    private Component xrayImage(FileDescriptor file) {
        XrayPreviewComponentFactory factory = new XrayPreviewComponentFactory(
                uiComponents,
                messageBundle
        );

        return factory.create(file); (3)
    }
}| 1 | 在表格的 selection 事件中获取选中的 FileDescriptor 实体 (X光照片) |
| 2 | 一个 X-Ray 组件被填充为 xrayImageWrapperLayout 的子组件,用于显示选中的 X光照片 |
| 3 | 创建 X-Ray 图片预览组件的逻辑在 XrayPreviewComponentFactory 类中实现 |
由于 X光图片预览也是一个多元素的组合,这个逻被提取到一个专门的 工厂 类。 最终UI布局由一个 GroupBox 和 Image 组件组成。文件显示显示在 GroupBox 的标题上, Image 组件作为 GroupBox 的内容显示。
列出的 XrayPreviewComponentFactory 类只包含了最主要的部分。预览功能中一个重要的部分是能同时支持图片和PDF文件的预览。这需要另外一个分支判断去基于文件类型使用正确的UI组件来实现,
public class XrayPreviewComponentFactory {

    public Component create(FileDescriptor file) {
        GroupBoxLayout groupBoxLayout = uiComponents.create(GroupBoxLayout.class);
        groupBoxLayout.setShowAsPanel(true); (1)
        groupBoxLayout.setStyleName("well");
        groupBoxLayout.setCaption(
                messageBundle.formatMessage("previewFile", file.getName())
        );
        if (isPdf(file)) {
            groupBoxLayout.add(xrayPdfComponent(file));
        }
        else if (isImage(file)){
            groupBoxLayout.add(xrayImageComponent(file));
        }
        return groupBoxLayout;
    }

    private boolean isPdf(FileDescriptor file) {
        return file.getExtension().contains("pdf");
    }

    // ...

    private Component xrayImageComponent(FileDescriptor imageFile) {
        Image image = uiComponents.create(Image.class);
        image.setScaleMode(Image.ScaleMode.SCALE_DOWN);
        image.setSource(FileDescriptorResource.class)
                .setFileDescriptor(imageFile); (2)
        return image;
    }

    private Component xrayPdfComponent(FileDescriptor imageFile) {
        BrowserFrame browserFrame = uiComponents.create(BrowserFrame.class);
        browserFrame.setSource(FileDescriptorResource.class)
                .setFileDescriptor(imageFile)
                .setMimeType(MediaType.APPLICATION_PDF_VALUE); (3)
        return browserFrame;
    }
}| 1 | 将组件外观设置 Vaadin Panel 外观 |
| 2 | 如果是图片, 则使用 Image 组件, 源将被设置为 FileDescriptor |
| 3 | 如果是 PDF 文件, 正确的 MIME 类型会被设置以在浏览器中渲染PDF文件 |
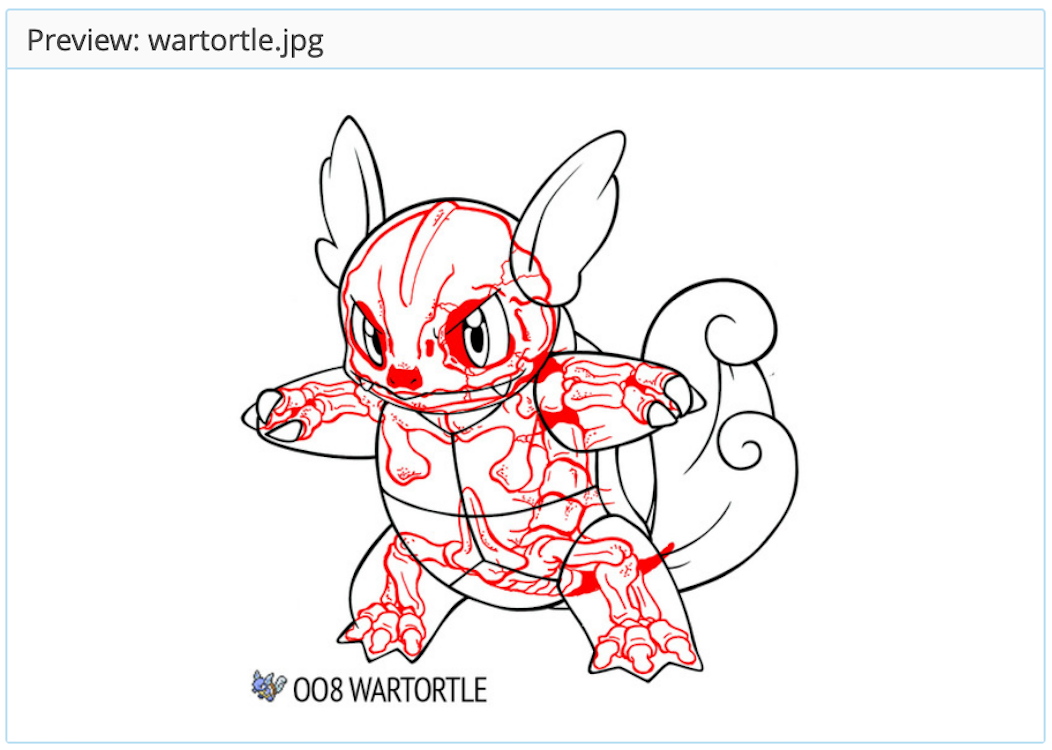
实现了以上两部分,X光照片的预览功能就完成了:
下载 X光照片
X光照片预览用例的最后一部分是图片文件的下载功能。
为了实现这个功能,一个额外的 download 按钮被在 xRayImagesTable 表格的上边。控制器代码中使用了 CUBA 框架提供的 ExportDisplay Bean 去触发浏览器中对 FileDescriptor 的下载。
public class VisitEdit extends StandardEditor<Visit> {

    @Inject
    protected ExportDisplay exportDisplay;

    @Subscribe("xRayImagesTable.download")
    protected void onXRayImagesTableDownload(Action.ActionPerformedEvent event) {
        downloadFile(xRayImagesTable.getSingleSelected());
    }

    private void downloadFile(FileDescriptor file) {
        exportDisplay.show(file, ExportFormat.OCTET_STREAM);
    }
}
exportDisplay bean 对于文件下载有多个选项。这里使用的是接受 FileDescriptor 的用法 。ExportFormat.OCTET_STREAM 指示浏览器应该强制下载文件而不是将文件渲染在页面中。
总结
CUBA 应用程序中的图片渲染和自定义元素组件可以显著地提高用户体验。主要的构成要素是 FileDescriptor 抽象,所有的UI组件都可以与 FileDescriptor 平滑地集成。
本指南中展示了两个用例。第一个用例中在 <form /> 组件中使用了标准的上传功能上传兽医头像,并且将头像显示在一个表格的生成列中。 另外创建了一个可以显示图片的 "PickerField"。 第二个用例中更直接地使用了 API 来上传、预览和下载 X光照片。